How to Quickly Reverse a Video Clip in DaVinci Resolve
[ad_1]


Reversing a video clip has the power to transform the ordinary into the extraordinary. Whether you’re looking to create a captivating effect or fulfill a specific editing objective, playing a sequence in reverse can add a layer of intrigue to your visual storytelling. DaVinci Resolve, a comprehensive and professional-grade video editing software, offers an intuitive pathway to accomplish this task.


This article will serve as your detailed roadmap, providing a step-by-step guide on how to reverse a clip in DaVinci Resolve. Whether you’re a seasoned video editor or just dipping your toes into the world of video editing, this guide is designed with simplicity in mind. Each step is explained clearly, ensuring that you can follow along with ease and achieve the desired result.
But that’s not all. In addition to guiding you through the process of reversing a clip, we will also share valuable insights and tips to enhance your overall video editing workflow. These nuggets of information have been gathered from experienced video editors and are aimed at helping you streamline your editing process, increase your efficiency, and elevate the quality of your final output.
By the end of this article, you’ll not only have learned how to reverse a clip in DaVinci Resolve, but you’ll also gain a deeper understanding of the software’s capabilities and how to leverage them effectively. So whether you’re working on a short film, a music video, or a personal project, this guide will equip you with the skills and knowledge to explore new creative possibilities and bring your unique vision to life.
So, ready to dive in? Let’s embark on this exciting journey of learning, creativity, and discovery together.
Getting Started
Ensure you have DaVinci Resolve open and the clip you wish to reverse is placed on your timeline.
- Play the clip to identify the section you wish to reverse.
- Pause and make a cut where you desire the reversal to begin.
- Delete any unwanted sections of the clip.


Preparing the Clip for Reversal
- Select the portion of the clip you want to reverse.
-
Hold
Alton your keyboard, then drag the selected portion to the desired location on your timeline. This action duplicates the selected portion. Drag it to the end of your first clip, so that the beginning of the new, copied clip starts where the original clip ends.


Reversing the Clip
- Right-click on the duplicated clip.
-
Navigate to
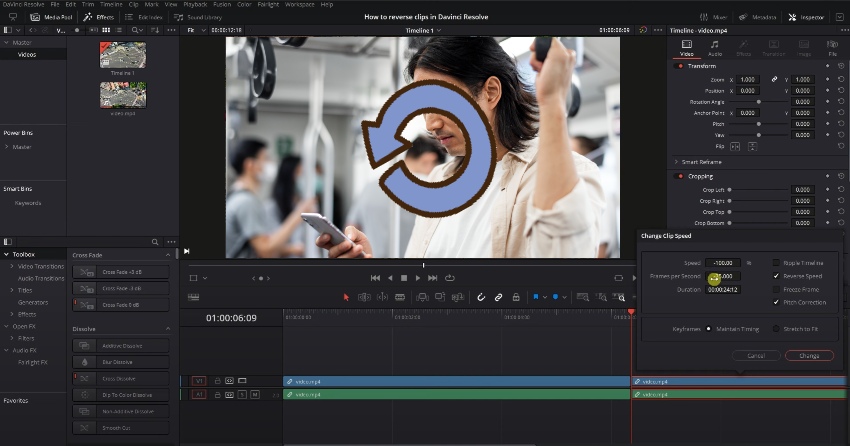
Change Clip Speedfrom the context menu. -
In the pop-up window, find and check the
Reverse Speedcheckbox.


Now, your clip should be playing in reverse. If done correctly, the Frames Per Second (FPS) value will show as negative, indicating the reversal.
Playing the Reversed Clip
Play your timeline to review the reversed clip. Ensure it aligns with your editing goals.


User clicks play button to replay for article on how to reverse clip in DaVinci Resolve.
Enhancing Your Reversal Process: Tips and Tricks for Success
When working with video editing, especially something as nuanced as reversing a clip, little adjustments can make a big difference. These tips are designed to guide you towards a smoother reversal process in DaVinci Resolve and help you create the most impactful visual effects.
One of the first things to pay attention to is the alignment of your timeline frame rate with that of your clip. This crucial step ensures the synchronization of audio and visual elements. Without it, you might find your sound doesn’t match up with your visuals, detracting from the overall viewing experience. So, before you begin the process of reversing your clip, take a moment to confirm these settings align. If they don’t, adjust them accordingly to avoid any discrepancies in your final output.
Next, don’t be afraid to play around with different playback speeds. DaVinci Resolve gives you the flexibility to adjust the speed of your reversed clip, and experimenting with this feature can lead to varying reversal effects. You might find that a slower playback speed adds a dramatic flair to your clip, while a faster speed could inject energy and excitement. Remember, there’s no one-size-fits-all approach when it comes to video editing, so feel free to experiment until you achieve an effect that aligns with your unique vision.
Lastly, if you’re interested in diving deeper into the world of video reversal effects, consider exploring the capabilities of DaVinci Resolve’s Fusion page. This advanced feature offers a plethora of options for creating complex visual effects and animations, including sophisticated reversal effects. By familiarizing yourself with the Fusion page, you open up a whole new realm of creative possibilities for your video editing projects.
Keep in mind, that mastering the art of video editing is a journey, not a destination. As you continue to explore the capabilities of DaVinci Resolve and apply these tips to your reversal process, you’ll soon discover your rhythm and style in creating compelling reversed clips.
Explore More with Envato Elements
Enhance your DaVinci Resolve projects with professional digital assets from Envato Elements. With a vast library of high-quality resources, you can find unique transitions, effects, and much more to elevate your video editing workflow.


Wrapping Up
Reversing a clip in DaVinci Resolve is a simple yet effective technique to add a unique flair to your video projects. Whether you’re creating a rewind effect, fixing footage, or just experimenting with creative editing, mastering this skill can be immensely beneficial. The steps outlined in this guide aim to provide a smooth journey through the reversal process, even for those new to DaVinci Resolve. With additional resources like those available on Envato Elements, the scope of what you can achieve is broadened significantly. As you continue to explore the vast functionalities of DaVinci Resolve, each editing challenge faced becomes an opportunity to hone your skills and produce captivating content. So, dive in, reverse some clips, and unveil the myriad of creative possibilities awaiting you in the realm of video editing.
[ad_2]